Since the Arts Council R&D project commenced in December 2013 Exploring Senses CIC has been evolving and expanding at a tremendous rate. In particular, in the last two months Exploring Senses artists have been working in a constant state of rapid growth, as we started three major contracts in August 2014.
Our first contract and artist collaboration is with Home Live Arts, who booked us to provide Toy Hacking and Robot Relays with augmented reality experiences, within their celebrated 'Alternative Village Fate';
Booking one = Hopscotch Day (community prep work for Shuffle Festival)
Booking two = Shuffle Festival (curated by Danny Boyle)
Booking three = LolliBop Festival (curated by the Southbank Centre)
All three events were a major success, and we hope the Home Live Arts connection will continue into 2015.
Our second major new contract is our collaboration with BACA school in Falmer, Brighton. Exploring Senses was asked to provide two weeks of arts and crafts orientated around Toy Hacking, Robotic CommuniToy, CommuniToy animations, Robot Relays and making tee shirts. The sessions were called 'My Imagination' and were a roaring success with the young people aged 10-11yrs, and the staff. Our third major contract is and collaboration with the Brighton and Hove Libraries Arts Council Funded project 'Evolving in Conversation. The project partners include Photoworks and South East Dance. Exploring Senses artists Hannah and David have been employed to assist in arts award delivery and arts activities and events programing. This is a long term project and we are very excited by this!
During the last two months the technology we ordered has started to arrive (Oculus Rift, Structure Sensor, 3D Printer, and Microsoft Kinect for Windows V2). Fortunately whilst Hannah and David were tied up with the BACA Summer School, Louis has had time to tinker with the technology, and has achieved amazing results, especially within this short time frame! Chris has also managed to build our Printrbot Simple 3D printer, although we are still in the process of getting to grips with the software to print.
The Young Inventors Centre is a two year funded Exploring Senses makerspace project to be located at Brighton Youth Centre twice weekly for ages 8-12yrs, and 13-19yrs. We decided to create a new neutral name for this project that is focused towards young people discovering what their natural skills, abilities and interests are, and we aim to achieve this by introducing an experimental learning program, which works similar to a hackspace/fablab, but has more structure. The Young Inventors Centre program of activities will be delivered by Exploring Senses artists and collaborators, it will include the latest cutting edge digital technologies, arts and crafts, analog and digital, low tech vs high tech. We understand that not everyone is destined to become a programmer, and that not all programmers are artists or makers in a physical sense, and that some people work best with their hands and others with their minds etc. We hope our activities will help young people with differing and complementing skills, and interests start to collaborate, just like Exploring Senses artists have with other artists and technologists. We draw our inspiration from similar projects such as the Dave Eggers '826 Valencia' approach to after school reading and writing clubs, a UK example of this being the London Ministry of Stories.
We would like to achieve similar goals, and ultimately aim to encourage young people to pursue careers they enjoy and to become active citizens.
The Brighton Fuse starts with the belief that by connecting the arts, humanities and design with digital and ICT, then creativity and innovation can be enhanced. An initial 2-year research and development project which mapped, measured and assisted Brighton’s creative, digital and IT (CDIT) cluster was carried out in 2013. The project supported mutually beneficial connections between higher education, those engaged in the creation of arts and culture and Brighton’s digital technology sector.
The report focussed on small CDIT cluster organisations of 7 or more staff members, which had an equal number of freelance employees, or possibly more! These organisations are run by entrepreneurs, who either have arts or humanities, and are generating 20% growth within the city of Brighton and Hove.
Bearing in mind the above information we have identified that Exploring Senses bridges four sectors;
Arts (commissions, education and community activities and events)
Third Sector (community, public workshops, Young Inventors Centre)
Education (arts, extra curricular, entrepreneurial, activities and events)
Public Sector (workshop commissions for businesses, team building days etc)
Current Funding
Through trial and error we understand that we must apply for project funding appropriately;
Arts Projects = Arts Council, arts commissions such as 'Shine of London Road', ICT and Art Connect, Home Live Arts and the Young Inventors Centre at Brighton Mini Maker Faire 2014, Brighton and Hove Libraries 'Evolving in Conversation'.
Third Sector = Peoples Health Trust, Local Council, Big Lottery, Sussex Community Foundation (local charities and trusts).
Education = Partnerships with local schools such as BACA, Oriel High, and Brighton Digital Festival Education Commission 2014
Public Sector = private workshop commissions such as BrightonSEO.
Future Funding
Exploring Senses will continue to expand upon our current funding strategy. We understand the growing importance of the Young Inventors Centre project, as we have identified that it can be embedded into three of Brighton's biggest regular festivals;
Arts = Brighton Festival/Fringe/B.fest Youth Arts Festival: May (for one month every year)
Digital = Brighton Digital Festival: September (for one month, every year)
Science/Education = Brighton Science Festival: February (for two weeks every year)
Also, we would like to take the Young Inventors Centre (YIC) to the road, and create a mobile maker space. We now have the tools, and are rapidly gaining knowledge of how the tools can be used together. Within the R&D project we have started to develop successful program of activities, which is unique to the Exploring Senses brand, and we understand there is a need for our services to create pathways for young people to discover sustainable and enjoyable career paths. With this in mind we would like to seek larger sustainable funding to enable Exploring Senses to grow to be able to achieve these goals.
Funding Possibilities
David Allistone will be meeting representatives from Community Works to discuss potential funding opportunities for Third Sector projects. We have identified the following suitable funders;
Arts Council = to enable Exploring Senses to expand and fine tune their R&D project ready to tour in art galleries and museums.
Arts Commissions and EU funding = to enable R&D of specific arts component within the bigger R&D Arts Council project, and to provide extra opportunities for collaboration.
Coast to capital = to enable YIC to go mobile to help generate new educational career pathways for young people to employment.
Big Lottery + Awards for All = to enable YIC to go mobile to help generate new educational career pathways for young people to employment, and to enable YIC program of activities during the Brighton Science Festival and/or Brighton Festival/Fringe/B.fest.
Sussex Community Foundation = to enable YIC program of activities during the Brighton Science Festival and/or Brighton Festival/Fringe/B.fest.
The Exploring Senses team is growing, and we are individually taking an active lead within our organisational roles;
David Allistone: Roles within Exploring Senses;
Company Director
Artist, Maker, Designer
Creative Director
Educator
Workshop facilitator
Youth Worker
Arts Award Advisor (qualified instructor at all levels)
Long Term Strategy Planner & Co-ordinator
Project Manager & Coordinator
Hannah Coxeter: roles within Exploring Senses;
Company Director
Artist, Maker, Designer
Creative Director
Educator
Workshop facilitator
Youth Worker (Youth leader in Charge at BYC, ages 13-19yrs)
Arts Award Advisor (qualified instructor at all levels)
Lead Arts Award Advisor for BYC + Brighton and Hove Youth Collective
Project Manager and Coordinator
Louis d'Aboville: roles within Exploring Senses;
Freelance collaborator
Digital Artist, Programer, Tinkerer,
Educator
Workshop facilitator
Youth Worker
Christopher Willatt: roles within Exploring Senses;
Company Director
Inventor
Electronics and Engineering
Educator (retired D&T teacher)
Workshop facilitator
CommuniToy Kits Designer
Business Strategy Advisor
The Future
Once a more sustainable model has been achieved, which resembles a brand product, we can start looking at larger funding such as the Technology Strategy Board. Below are some links to other possible funding streams;
Our broad aims for our R&D period were to "design and make CommuniToy artifacts that are robotic, virtual, animated, motion reactive and explore the fusion of craft techniques and digital technologies."
I have mainly been looking at the software side of this. Investigating, learning, and experimenting with a range of different technologies to find interesting ways to do these things, to integrate them with what we do, and to develop new ways to engage with content generated by young people.
This list of posts from the R&D blog summarizes the highlights from tools investigated and projects completed during this research (in a roughly chronological order).
This has been an extremely fruitful few months for Exploring Senses. The most exiting outcome for me has been gaining a working knowledge of the available tools out there to create, modify and display 3D models. We have started to accumulate a library of 3D scanned toy hacks and body parts, and found ways of getting these into augmented reality and virtual reality experiences, and over the next few months will be refining our workflow for this further, and developing these into an exhibit-able form.
Over the course of the research, the technologies available to us have changed drastically. Lots of things have become more accessible, and many significant advances have been made. We have acquired an Oculus Rift, a 3D printer and a Microsoft Kinect v2, and the direction of our investigations have shifted accordingly.
As these are such relatively young technologies, many are still in a somewhat rough, experimental state. As such, and also as a result of taking a broad approach to look at as many avenues as possible in our research. we have not achieved a huge amount with any single one of them yet, but we have a good overview of what is out there, and what we want to do next.
We will be using our newly acquired Structure Sensor to build up a lirbary of scanned models.
Digging a little deeper over the next few months will be extremely interesting, as many of these technologies are just on the brink of being in a state where they are usable, affordable, and available to the general public. We are very excited to explore the space of possibilities as it unfolds, and have a ton of ideas for directions to take things, future projects, and things to explore during the young inventors center makerspace project.
The Oculus rift is an extremely exciting technology, with lots of possibilities for creating not only more immersive versions of existing mediums, but also for inventing and exploring entirely new forms of experience altogether. It allows you to modify (and hack) your experience at a very primal level, and we are very excited to see what we can make with it.
Our interest was well and truly piqued When David Allistone and Louis d'Aboville visited Inition studios in London for a Virtual Reality open day (event blog post here) I was really taken aback by Nissan's "Vertigo" experience, and how visceral my reaction to it was even though I knew, and could clearly see that it wasn't real.
This very nearly made me throw up
The (Cognitive) Science Bit :
A huge part of your brain is dedicated to processing visual information, so visual input is an incredibly powerful force in influencing how you experience and perceive the world around you. I studied cognitive science at University for a while, and find this area fascinating. I particularly like the idea that your proprioception (your brain's internal model of what the body is feeling) can be subverted and that you can be made to feel things that aren't real.
This vertigo VR experience was incredibly powerful, and really stuck with me. It brought to mind the rubber hand illusion. This is a famous cognitive science party trick which uses visual stimuli to fool your body into feeling an arm that isn't yours as your own :
This same effect has been applied by Vilayanur Ramachandran to help patients overcome phantom limb pains (an excruciating condition that was previously extremely difficult to treat)
Cognitive scientists have also used this effect to induce out of body experiences in the past using VR goggles
At the ICT Art connect conference David and Louis attended in February (##BLOG LINK##), one of the most interesting talks was by a chap named Carl H Smith.
He is an academic researcher looking into what he calls "Context Engineering" Context engineering is the idea f technologies or experiences that by changing the way we are presented with information, trick us, and expose the fact that many of the things we take for granted as fixed in how we perceive the world are in fact, fluid and entirely changeable.For example, an optical illusion is definitely context engineering. It uses subtle visual cues to trick the systems in our brain that help decide what exactly it is that we are looking at
Another very interesting example of context engineering is an experiment which involves fitting people with glasses that flip the world either upside down or back to front
The crazy thing is that after a while, your brain can completely adjust to this, and no longer experiences the upside down world as seeming strange. When you take the goggles off, you actually need to go through the whole thing and readjust to having right way up vision! (although the more you do it the less time this takes)
People have even gotten so used to it that they could put the goggles on and take them off whilst riding a bike! If your brain can adjust to that, then surely there's all sorts of interesting superpowers you could give yourself....
How about 360 degree vision? The FlyVIZ headset gives you a panoramic view stitched together in realtime, so you can see behind yourself.
According to the people that make the headset, people can usually adjust in just 15 minutes to having 360 vision!
With the oculus rift, all sorts of new possibilities exist. One project that Carl H Smith showed in his talk at ICT Art Connect was this project, that lets two people swap bodies.
We only got the Oculus at the end of June, and have unfortunately been too busy with other things to get stuck into making anything much for it so far.
We did, however get the example project in Unity running, and get some 3D scans of cross dressing smurfs into it :
I also got it up and running in TouchDesigner, and although this is not the easiest tool for creating lots of 3D content, it could be very useful in creating audio and motion controlled effects and experiences in the future
Exploring Senses artist Louis d'Aboville recently started working with local artists Kate Genevieve and Rachel Blackman to develop technologies for a workshop and exhibition for Brighton Digital festival. As a result of this, he will also be working with Kate and her colleague Keisuke Suzuki from Sussex University to resurrect and update an Oculus rift project made with Paul Hayes last year.
Kate has previously made a VR piece investigating sensory illusions for White Night festival :
The project with Paul hayes is called Gather, and is described here as follows :
"Gather, a multisensory animation, combines immersive animation and touch, to explore a viewer’s sense of where the body stops and the environment begins. Gather is made as an animated short film for Video Head Goggles. It plays with manipulating a viewer’s sense of touch and vision: participants watch animated visuals through a Head Mounted Display whilst holding out one hand which is stimulated in time to visual effects they see through the goggles. Each animated effect is augmented by tactile sensation; whether it is holding a stone in the hand or a leaf touching the fingertips."
It is a kind of meditative experience incorporation sensory illusions. This will be the perfect project to pick up the Unity skills necessary to start creating our own experiences from scratch. It is also absolutely perfect for trying out the new Oculus rift Leap Motion mounts.
In the future we would love to try and develop something similar. I think this demo was clearly what I had in mind when making this version of a 3D scanned smurf model :
Also, once we have accumulated enough good quality 3D models, we think a fun, and entirely acheivable first project could be a surreal take on the idea of a rollercoaster demo, and we would like to make a kind of toy hack ghost train experience. Who knows, maybe we will even take it on a real rollercoaster one day!
Some of our 3D research is already documented in this post here, In this post I will try to cover all the other things not mentioned already.
We have been investigating ways to generate 3D content for use in virtual reality and augmented reality experiences. This has covered both 3D modelling, and 3D scanning.
Maya
I went through this tutorial, and tried to apply the same workflow to create a more organic looking model. This is the nicest thing I came up with :
Here's the same model imported into TouchDesigner :
Z - Brush
In terms of 3D modelling, there is an awful lot of software out there, but one of the nicest things I came across was something called Z-Brush. Z brush is unlike most other 3D software packages out there, in that it takes a very physical approach to modelling. You get what is essentially a little ball of clay to start from and push, pull, crease, and smooth it to get the shape you want. This is a lot more natural than manipulating points, vertices and faces, and allows for much more organic shapes.
It is mainly used for creating extremely detailed, organic models such as those for video games, concept art or CG movies.
My first attempt at making something in Z-Brush turned into something resembling a bat
I introduced it to some of the young people at the Self Managed Learning college, where David, Louis and Chris teach each week. They took to it extremely quickly, and made everything from the silly and immature :
...to some really rather nice abstract compositions
(all of which I like much more than anything I have made!)
I quickly realised that recreating toy parts from scratch in Z-Brush was not quite as easy as all the fancy time lapse videos on youtube would have you believe. It really is a skill that you would need to develop over several years to get anywhere near this good :
So instead of creating models from scratch, we decided to look into how we could digitize existing toy hack creations, and find ways of 3D scanning them.
123D Catch
The most promising looking software I could find to do this is AutoDesk's 123D catch. It creates 3D models from a series of overlapping photos by matching points between images and measuring how far they move in relation to each other between shots. It all happens automatically, and you get a textured 3D model.
This all sounds great, and mostly it is, but as I mentioned in my previous 3D research post the models it gives you are :
- very complicated - (millions of polygons) - noisy, bumpy and innacurate unless you have perfect lighting conditions (this is even more pronounced on smaller objects such as toys) - often full of holes - (not good for 3D printing) - nearly always come with multiple texture maps - (makes it tricky importing them into game engines and apps like Aurasma)
I put all of the toys that we 3D scanned up on the 123D catch site, and you can see them in this gallery here
I think my favourite has to be "Pyramid Man" (I wasn't feeling particularly creative when naming my uploads)
I spent a long time going through tutorials to try and help me figure out how to clean up, simplify, and export the models it gave me. Being completely new to all 3D software I found it very tricky to navigate all the new 3D jargon people were casually throwing around. Quite often in a tutorial, you'd be following along, and they'll say something like "and now just take that into Maya and remap all the UVs", cut back to after it's done and you'd spend another two hours going through UV mapping tutorials trying to figure out what they did.
Here are a few of the best tutorials I found for doing this (although inevitably one step somewhere wouldn't work in each one and you have to piece bit together from other places to carry on)
Eventually I did have some success with Z-Brush, and discovered several handy tools such as the decimate tool (for intelligently reducing the number of polygons in your model) There is also a tool in Z-brush called Dynamesh, which can help turn this:
Into this :
This model has been simplified using the Decimate tool, and is made of triangles rather than quads:
Unfortunately once I had managed to simplify the model, getting texture information to then map correctly to the low poly model is something I never quite figured out. This was about the closest I managed to get :
This tutorial for Maya looks extremely promising, butt again I had issues with texture not appearing correctly
Aurasma is a rather nifty little ipad app, which lets you create augmented reality experiences very quickly. You attach certain content to a trigger image, and then when you look at the trigger image through the app to see the content dynamically mapped onto it.
You can use Aurasma to do Augmented Reality body hacking!
This was a happy accident that happened very recently, and is something we will most definitely
be investigating further in the future!
The artist and cricital engineer Julian Oliver (who will again feature in Brighton Digital festival this year) has made some very interesting things with AR in the past, including this game :
And this fantastic project, called "the Artvertiser"
(a computer encased in some retro looking goggles, which replace billboards with Art)
We absolutely love the message of this project, and it's playful, subversive approach
In Aurasma, you can map 2D images, 3D models, and also sound to a trigger image. The app calls these mappings "Auras" Once you have made an "Aura", you can add it to your channel. You can find and follow other people's channels, which lets you see any Auras that they have made, and can likewise share yours.
Exploring Senses have made a channel, which you can follow by either scanning our (lovely and vibrant) QR code above, or going to http://auras.ma/s/NC5Tj from any mobile device.
There are some example trigger images up on our Aurasma facebook album for you to see it for yourself, or try poking around our website, there may be a few surprises lying around....
It is relatively quick and easy to link 2D content to trigger images, but I figured it was worth looking into how to get your own custom 3D content in there. I had been researching 3D scanning a bit, and had a rudimentary understanding of 3D modelling software, so this was the perfect excuse to learn.
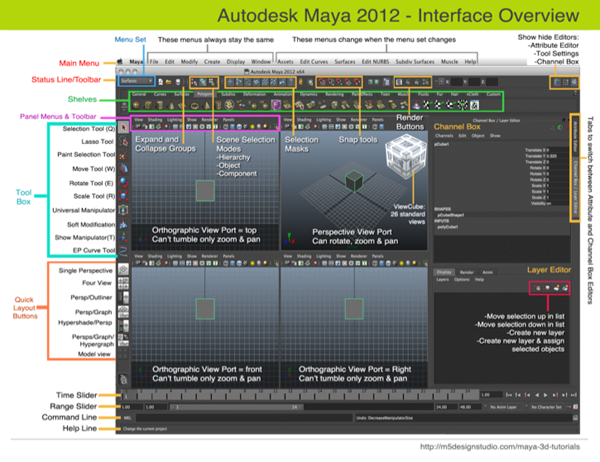
Autodesk Maya is the modelling software of choice if you want to make content for Aurasma, so that is what I got stuck into learning. The interface is somewhat overwhelming at first, with an absurd amount of different options available, and several different interface 'modes' that reveal whole other sections and toolbars.....
You got all that yeah?
This tutorial gives a good overview of how to get a textured 3D model from Maya into Aurasma, and was very helpful, as it requires a very specific set, and format of files to work properly.
This tutorial is great, but it starts with an already made 3D model complete with textures. I wanted to also learn how to create, model, and texture things from scratch.
There are a ton of different Maya tutorials out there at lots of different levels, so I spent a while watching them and soaking up what on earth all the different bits of the interface are for, and how people use it for different tasks before diving in. Once you get your head round the basics, and understand what is possible, with a few common shortcuts, it is an incredibly powerful, quick and easy to use bit of software.
In order to share what I learned during this period of research I created my first ever video tutorial. Starting completely from scratch I go through how to :
- Download and install a trial version of Maya
- Create and edit 3D models
- Add textures and map them to the faces of the models.
- Use keyframes to add animation to the model (and "bake" these animations so Aurasma can read them)
- Export all the files needed for Aurasma
- Use Aurasma's dashboard to assign your model to a trigger image, and overlay it as an "Aura"
Here is a video demonstrating some of the 2D, 3D, and animated Auras we made :
And here are some screenshots of them from Aurasma :
This robot arm is animated (as you can see in video above)
Some kind of boimechanical bird / robot arm thing. This was a result of my experiments
to try and create jointed models and rigging then for animation.
David Allistone produced this animated overlay cleverly to bring the LED matrix to life.
It also has music, which makes it more fun, and is something we will be investigating further in the future
Experimenting with minimal, abstract wireframe picture frames for the website
Slightly more polished looking picture frames
This abstract floating smurf model is definitely my favourite.
The 3D scanned smurf model above, and the animated LED matrix were the two most compelling AR experiences we created, and we will definitely be developing and researching these avenues further over the coming months.
Unfortunately, cleaning up the 3D smurf model into a suitable format was not at all easy, and took a whole lot of trial and error to get it to work nicely. (see 3D scanning and modelling blog post) Refining this workflow is a priority task for us in the future.
Once we have a decent library of 3D toy models, we would like to create a small book with images on each page that we can use as a portable exhibition. The book would be filled with bespoke trigger images which would stand on it's their own as a pieces of art, and with the models overlayed would also be a great way to showcase creations from previous workshops (plus it would save us lugging a whole load of extra toys around!)
Unfortunately, as with a lot of our technical research, we are only just getting to the exciting bits now, as it has taken a while to become aware of, and start learning how to use the right tools for the job. In July and August though, we started to integrate these into some activities and workshops.
In July we did a series of events with Home Live Art (which incidentally came about through conversation and collaboration with mASCot at our new R&D hub in Prestamex house) We used these events as a testing ground for taking content created by children, and mapping it to images which could be printed out and attached to cardboard cretions in a Robot Relays workshop.
Animata "is an open source real-time animation software, designed to create animations, interactive background projections for concerts, theatre and dance performances."
It is the closest thing out there to a real time version of After Effects' excellent Puppet Tool, and lets you create complex animations from 2D images. It works in much the same way, although is nowhere near as automatic. To create a puppet from a 2D image in Animata you have to manually create and rig the mesh yourself. This requires you to :
1. Import the image you want and move/scale it to fit on the screen.
2. Draw a series of points around your model to be used as vertices for a mesh.
3. Auto-create a triangle mesh by grouping these vertices together.
4. Manually fix any errors made by the auto-triangulation
5. Add points where Joints will go
6. Create bones by connecting joints
6. Attach each bone to all the right vertices (so that the mesh moves with the bones nicely)
7. Adjust the weightings on the joints to create spring constraints
8. Move the joints around and test the meshes movement
9. Keep adjusting weightings, attachments, and skeleton structure until you get a natural looking motion
This would all be well and good, except Animata is missing a really rather crucial feature...
AN UNDO FUNCTION!!!
Trying to go through all these steps, where there are lots of irreversible ways to mess you model up (if you wiggle the wrong bone about by accident it can bunch up, and you have to go back to your last save) is a somewhat painful experience. You have to be extremely careful and methodical.
It took some time, but after a bit of tinkering I figured out a system that worked, and was able to create some rigged meshes for a few different toy hacks :
A triangle mesh created for this BeaverWhale (or maybe it's a WhaleBeaver?)
And one created for this (slightly menacing) box with the arms of a baby
The baby with the skeleton in place.
In this picture, I am attaching vertices to the bone in the hand on the right
A fully rigged puppet, with the darker bones acting as springs to constrain the motion/
Once you have created these meshes, you can give the joints names, and then control them by sending them OSC messages. (OSC is a super handy messaging protocol for sending information between programs. Basically MIDI for programmers)
Now for the fun part - To manipulate them in realtime! There are a number of ways to get motion tracking data into the right format of OSC message, but my preferred tool of choice was TouchDesigner. I created a custom patch to read in information from a Leap Motion hand tracking controller, and remap it into the right ranges, and message formats to control the puppets appropriately. I designed the patch to make it extremely quick and easy to tweak the ranges and change the names of the control messages.
TouchDesigner patch to contol Animata with a Leap Motion controller
The only model I successfully got to move in a vaguely natural way
It is very much a trial and error process, but some of the results were really quite impressive, and when you get it right it is super fun to play with. Unfortunately, as it is homebrew software developed by a very small team it is just not quite stable enough to use for a serious project. It has an incredibly annoying habit of incorrectly resizing your output display to be either way too big or way too small, and there are a lot of ways to mess up your project irreversibly, forcing you to quit and reopen your last save. This is simply not workable for an installation context unfortunately, at least without heavy supervision, and frequent restarts.
Here is a video of me destruction testing two models at once :


.png)
.png)


.png)
.png)
.png)
.png)
.png)
.png)
.png)
.png)
.png)
.png)
.png)
.png)
.png)
.png)
.png)
.png)
.png)
.png)
.png)
.png)


.PNG)
.PNG)
.PNG)
.PNG)

.PNG)


.png)
.png)
.png)
.png)
.png)